
Sewing a doll dress, a tutorial

I know, right? how formal! But this is my first-ever tutorial and I wanted to sound much more professional and knowledgeable than I really am. I have promised tutorials for all my sweet doll recipients for so long, that I feel like I've really been a slacker.
This tutorial will "walk" you through creating a very simple dress for your doll.
I wrote it in a way that you can actually sew it for a 10", 12", 14" or 18" doll. I will give measurements for a 16" doll of mine, but you can really take the instructions and make it for whatever size of doll you own.
Ingredients
First, you will need to gather the following materials:
- two different fabrics, preferably woven, with a right and wrong side (so you can see much better which side you are working with, especially important if you are a beginner). You really need very small amounts. For the skirt of your dress you will need a piece about 1/4 of a yard, and a minimal amount for the bodice of your dress.
- ribbon, crochet ties, bias tape, etc. whatever material you would like to use to make the ties for the dress, and the length of course will depend on the size of your doll. I used two strips of bias tape, sewn together, and 30 cms. in length each, because I like to tie big bows.
- 1" of velcro tape (hook and loop).
- And all the normal sewing parafernalia, like pins, scissors, fabric marker, etc. A sewing machine is important too. jejeje!
Notes: when you start sewing, you will sew 1 cm. from the raw edge. This is your seam allowance, accounted for in all your measuring.
1. Measuring
First, I want you to measure your doll's chest circumference. You are going to measure your doll around her chest, and overlap the tape by 2 cms.
Once you have this measurement you will add 2 extra cms for seam allowance. My total measurement ended up being 34 cms. This is the measurement of your bodice length ( m1).

Measure now the bodice width (m2). You are going to measure one centimeter down from her neckline and measure about mid chest.
This will be the width of the bodice of your doll's dress. Once you have this measurement you will add another 2 cms for seam allowances. Mine ended up being 5 cms.
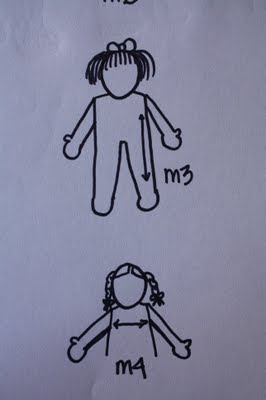
Now you are going to measure your doll 3 cms down her arm pit (a little less if your doll is smaller, perhaps the same if your doll is much bigger) and go as long as you want the dress to be.
Once you have this measurement, add 2.5 cms for hem allowance. Mine ended up being a total of 20 cms. This is the skirt length measurement (m3).
Now measure your doll's chest, as in the figure. Once you have this number, please add another 2 cms for side seam allowances. This will be your chest measurement (m4).
2. Tracing a pattern.
Now, you are going to make a bodice pattern. Put your bodice measurement (m1) as length and your bodice width (m2). You will get a rectangle. Fold it in half vertically, this will give you the center front for the bodice. To give the dress a little bit more flair, we are going to cut it like this.

You will do it by taking the measurement of your chest (m4), divinding in half, and placing this measurement on the center front fold you just did. This will give you a pattern shape like this one. This will ensure that the dress comes up in front of the arms and covers your doll's chest most properly and that the arms have a cute nook.
Now that you have your bodice pattern, you are going to cut fabrics. Feel free to eat a lot of chocolate, as you are probably already exhausted from all that measuring.
3. Cutting fabrics
Now, mark on the wrong side of your bodice fabric (A) two pieces with your bodice pattern. Cut.

on the picture, I have a folded rectangle, and two views of my bodice pattern cut.
Now, you are going to cut a piece of your fabric (B) this way: take the measurement of your chest circumference (m1) and double it. This measurement will be the width of your skirt. And your (m3) will be the length. You will end up with a very long rectangle. This will be the skirt of your dress.
4. Sewing Bodice.

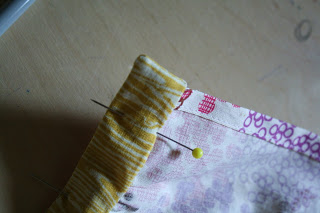
Place two ties (ribbon, bias tape sewn together, crochet ties, etc) as shown. Pin.

Place second piece of bodice fabric on top and pin together. Sew along, with 1cm. seam allowance. Make sure to back track your stitches at the beginning and end of your sewing, so your bodice doesnt start to fall apart when you work with the skirt.

Trim corners, as shown, (cutting diagonally the outside corners, and clipping the inside ones) and grade the seams. Cut close to the seams, but be careful not to cut through. Grading the seams means that you are going to cut them smaller to reduce the bulk of fabric, and once you turn the whole thing, the result is much nicer.

Turn inside out and press. Pressing will bring out the seams and make it look very top notch.

Fold one bottom up, about 1 cm, and press. Set aside.
5. Sewing Skirt.
Now you are going to grab your uber big rectangle. Left and right side, your are going to turn .5 cms, and then turn again .5 cms, and press.
Then, the bottom side, which will be the hem of your dress, you are going to turn .5 cm, and then fold another 1.5 cms and press. Now sew all this pressed sides.

Using your machine's widest stitch, sew one gathering line 4 mm from the raw edge of the side you did not press (the one that runs paralell to your hem), and then again another 4 mm down.
These two sewing lines will become your gathering threads. At one end you are going to tie them together and knot them, and at the other end you are going to gather the bobbin threads until your skirt matches perfectly with your bodice.

6. Piecing your Skirt and Bodice.
Now, having matched both pieces, pin them together like this.

Make sure that the right side of your skirt is against the right side of your bodice. Tell-tale sign is, the turned side of your bodice should be looking up.

Return the stitch length to the appropriate number, as you were sewing with the widest setting.
Now, sew slowly, removing pins as you go and making sure the gathering lines of your skirt are being sewn inside the seam. Otherwise they will show on the right side.

Now, trim the little corners at beginning and end, just to reduce a little bulk.


Pin again the two pieces together, as shown, and hand sew them together. This creates a perfectly lined bodice and no visible stitches on either side.

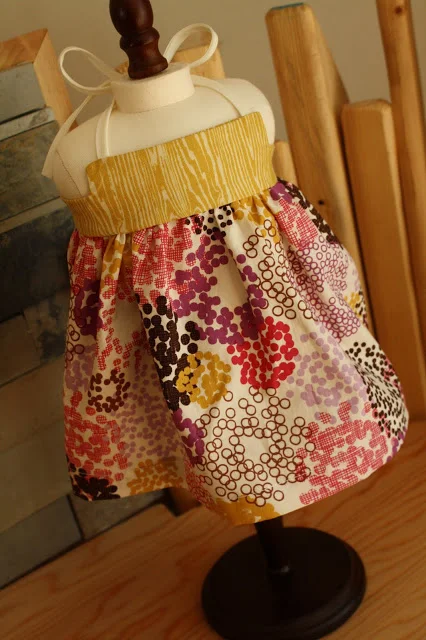
Sew velcro tape, on the back, one side up and one side down (make sure that when you close the dress the meet perfectly on top of each other) and voila. You have a perfectly sewn dress for your dollie!

The possibilities of this simple dress are endless. You can use your child's out-grown clothing; use old pieces of lace to embellish the bodice; use really wide ribbons for ties; add pockets, ric rac, patches, decorative buttons, you name it. Your doll can use it as a summer dress, or as a pinafore.
I hope this tutorial was clear enough, but if you have any questions let me know.
Happy sewing,